- FlaskにおけるBlueprintの機能を理解する
- Blueprintの特徴と利用方法を理解する
- app.register_blueprint()関数を理解する
上記をまとめ、具体的なコードやBlueprintの使い方を重点的に解説します。
Blueprintとは
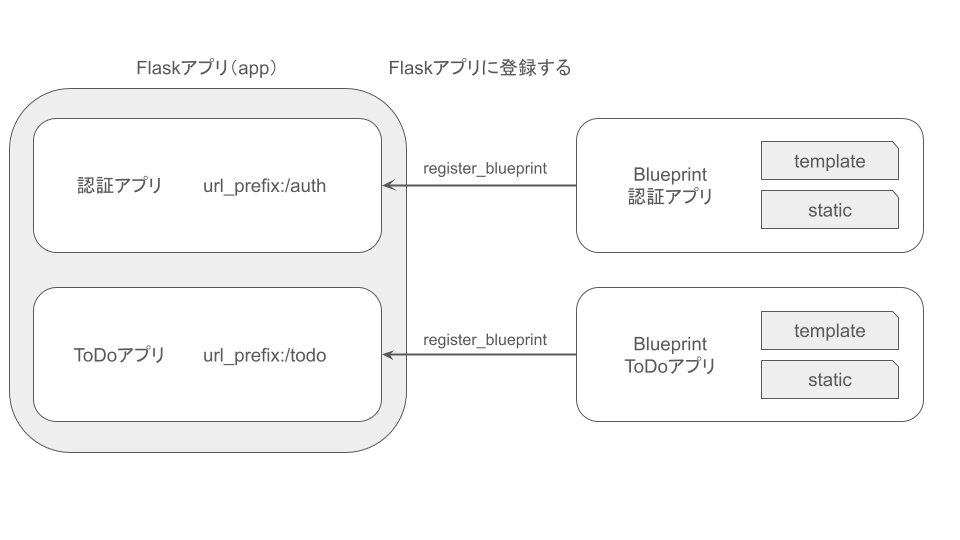
Blueprintとは、アプリケーションを分割するためのFlaskの拡張機能です。
Blueprintを利用すると、アプリケーション全体が大規模になっても簡潔な状態を保ち、アプリの保守性が向上します。
また、アプリを分割しているため1ファイルにおけるコードの可読性も高めます。
- アプリケーション全体の保守性向上
- 1ファイルにおけるコードの可読性向上
ディレクトリ構成が可視化しやすいため、開発効率も高まるメリットがあります。
Blueprintの特徴
FlaskにおけるBlueprintは、次のような特徴があります。
- アプリケーションを分割できる
- url_prefix, subdomainを指定しアプリケーションルートを区別できる
- Blueprint単位でテンプレートを分けられる
- Blueprint単位で静的ファイルを分けられる
Blueprintの利用方法(生成例)
以下は、Blueprintオブジェクトの生成例です。
from flask import Blueprint

'''
template_folderとstatic_folderを指定しない場合は、
Blueprintアプリ用のテンプレートと静的ファイルは利用できない
'''

sample = Blueprint(
    __name__,
    "sample",
    template_folder = "templates",
    static_folder = "static",
    url_prefix = "/sample",
    subdomain = "sample",
)
以下は、Blueprintクラスの主なコンストラクタです。
| 引数 | 説明 |
|---|---|
| name | Blueprintアプリの名前。各エンドポイント名の前に追加される。 |
| import_name | Blueprintアプリのパッケージの名前。通常は__name__を指定する。 |
| template_folder | Blueprintアプリのテンプレート用ディレクトリ。デフォルトで無効。Blueprintのテンプレートはアプリ本体のテンプレートより優先度が低い。 |
| static_folder | Blueprintアプリの静的ファイル用ディレクトリ。デフォルトで無効。 |
| url_prefix | Blueprintアプリの全URLの先頭に追加し、他のアプリルートと区別するパス。 |
| subdomain | Blueprintをサブドメインとして利用する場合に指定する。 |
また、生成したBlueprintオブジェクトは、次のようにregister_blueprint関数でappに登録します。
app.register_blueprint(sample, url_prefix="/sample", subdomain="sample")以下は、register_blueprintの代表的な引数です。
| 引数 | 説明 |
|---|---|
| blueprint | 登録するBlueprintアプリ。Blueprintクラスのオブジェクトを指定する。 |
| url_prefix | Blueprintアプリの全URLの先頭に追加し、他のアプリルートと区別するパス。 |
| subdomain | Blueprintをサブドメインとして利用する場合に指定する。 |
複数のBlueprintにおけるテンプレート利用の注意点
複数のBlueprintが同じ相対テンプレートパスを利用する場合、最初に登録したBlueprintのテンプレートが優先されます。
そのため、他のBlueprintのテンプレートを作成しても2つ目以降のテンプレートが表示できなくなります。
上記を回避するには、templatesディレクトリとHTMLファイルの間にBlueprintで登録したアプリ名のディレクトリを挟む必要があります。
以下は、Blueprintを考慮したディレクトリ構成の例になります。
flask-project
├── .env
├── apps
│   ├── app.py
│   ├── config.py
│   ├── static
│   │   └── bootstrap.min.css
│   ├── auth ← blueprintアプリ
│   │   ├── __init__.py
│   │   ├── forms.py
│   │   ├── models.py
│   │   ├── static/css
│   │   │   └── style.css
│   │   ├── templates
│   │   │   └── auth ← ディレクトリを挟む
│   │   │       ├── base.html
│   │   │       ├── index.html
│   │   │       ├── login.html
│   │   │       └── signup.html
│   │   └── views.py
│   └── todo ← blueprintアプリ
│       ├── __init__.py
│       ├── forms.py
│       ├── models.py
│       ├── static
│       │   └── style.css
│       ├── templates
│       │   └── todo ← ディレクトリを挟む
│       │       ├── base.html
│       │       ├── index.html
│       │       ├── todo_create.html
│       │       ├── todo_edit.html
│       │       ├── todo_done.html
│       │       └── todo_delete.html
│       └── views.py
├── local.sqlite
└── migrations
templatesとHTMLファイルの間にアプリ名のディレクトリを挟むことで明示的にパスを分け、Flaskが解釈できるよう構成します。
Blueprintとapp.register_blueprintの具体例
ここでは、上述した内容を具体例で示しながら解説します。
また、以下のBlueprintアプリによるディレクトリ構成で進めていきます。
app.py, 各Blueprintアプリのviews.pyを中心に解説します。
flask-project
├── .env
├── apps
│   ├── app.py
│   ├── config.py
│   ├── static
│   │   └── bootstrap.min.css
│   ├── auth
│   │   ├── __init__.py
│   │   ├── forms.py
│   │   ├── models.py
│   │   ├── static/css
│   │   │   └── style.css
│   │   ├── templates
│   │   │   └── auth
│   │   │       ├── base.html
│   │   │       ├── index.html
│   │   │       ├── login.html
│   │   │       └── signup.html
│   │   └── views.py
│   └── todo
│       ├── __init__.py
│       ├── forms.py
│       ├── models.py
│       ├── static
│       │   └── style.css
│       ├── templates
│       │   └── todo
│       │       ├── base.html
│       │       ├── index.html
│       │       ├── todo_create.html
│       │       ├── todo_edit.html
│       │       ├── todo_done.html
│       │       └── todo_delete.html
│       └── views.py
├── local.sqlite
└── migrations
また、Blueprintアプリ登録までの流れは以下の通りです。
- Blueprintのインポート
- Blueprintオブジェクトを作成
- app.register_blueprint()関数でアプリを登録
Blueprintのインポート
Flaskの機能であるBlueprintのインポートは以下になります。
from flask import Blueprintfrom flask import Blueprintここでは、認証アプリとToDoアプリを分割して作成しているため、各アプリでBlueprintをインポートしています。
Blueprintオブジェクトを作成
次に、Blueprintオブジェクトを作成します。
from flask import Blueprint

# Blueprintでauthを作成する
auth = Blueprint(
    "auth",
    __name__,
    template_folder = "templates",
    static_folder = "static",
)
from flask import Blueprint
# Blueprintでtodoを作成する
todo = Blueprint(
"todo",
__name__,
template_folder = "templates",
static_folder = "static",
)Blueprintオブジェクトを作成したら、app.register_blueprint()関数にてアプリを登録します。
app.register_blueprint()関数でアプリを登録
app.register_blueprint()関数でアプリを登録するため、app.pyにコードを追加します。
# ...省略...

def create_app(config_key):
    # Flaskインスタンス生成
    app = Flask(__name__)

    # ...省略...

    # authパッケージからviewsをインポート
    from apps.auth import views as auth_views
    # todoパッケージからviewsをインポート
    from apps.todo import views as todo_views

    # register_blueprintを利用してviewsのauthをアプリへ登録
    app.register_blueprint(auth_views.auth, url_prefix="/auth")
    # register_blueprintを利用してviewsのtodoをアプリへ登録
    app.register_blueprint(todo_views.todo, url_prefix="/todo")

    return app
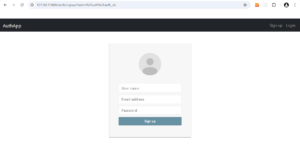
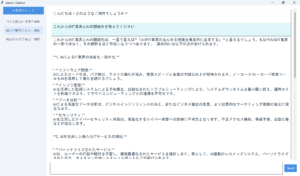
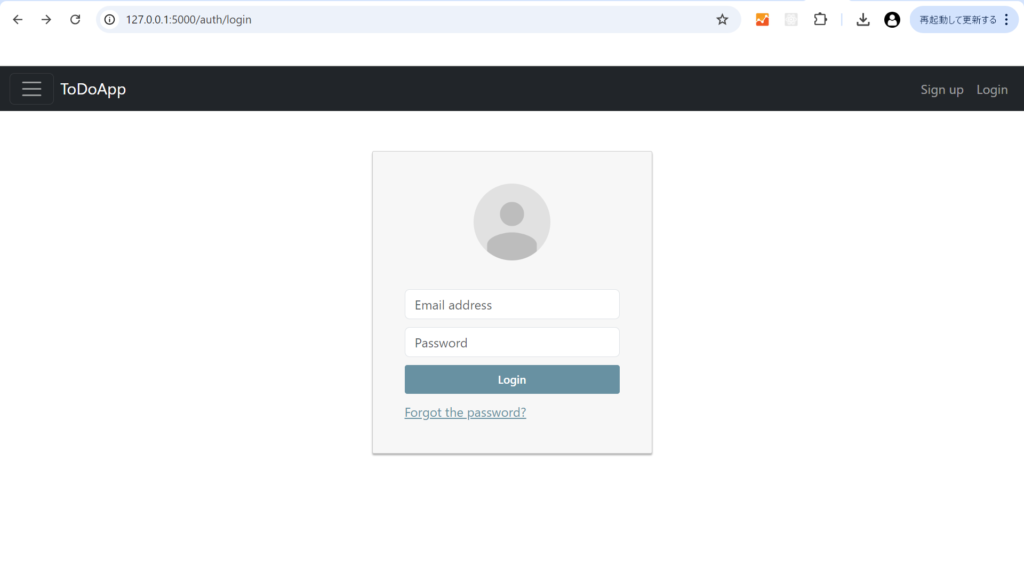
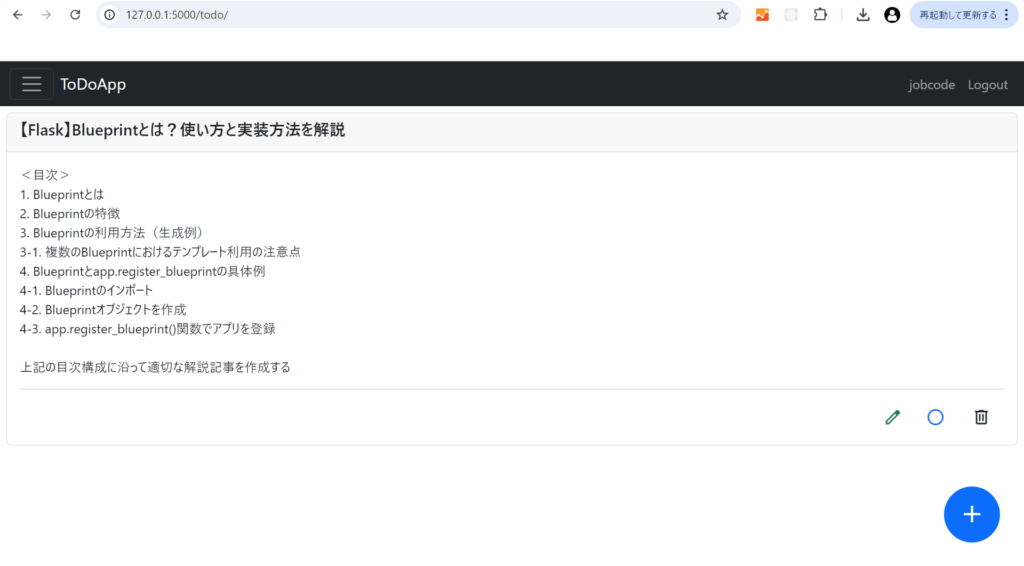
Blueprintアプリをappに登録後、各URLにアクセスします。
また、/authへアクセスした場合にログインページに遷移する仕様にしています。
認証アプリの画面は以下になります。(URL:/auth)
ToDoアプリの画面は以下になります。(URL:/todo)
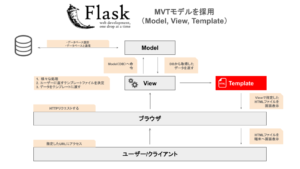
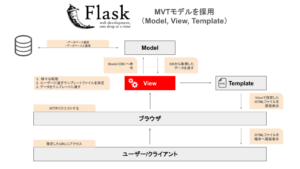
FlaskのMVTモデルをBlueprintに利用する
Blueprintによってアプリ分割した場合でも、分割したアプリごとにMVTモデルを適用させる必要があります。
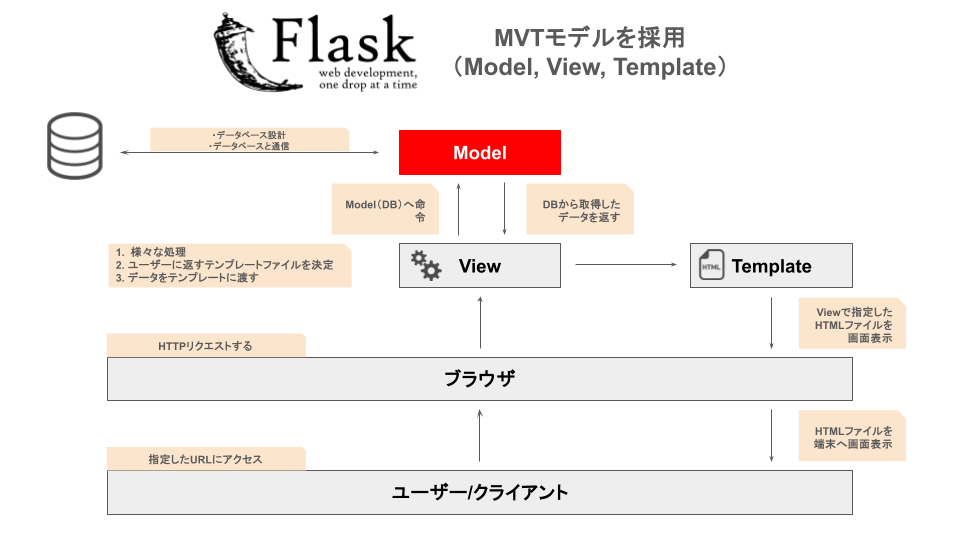
Flaskは、UIを持つアプリを実装するデザインパターンとしてMVTモデル(Model/View/Template)を採用してます。
Model/View/Templateは以下の役割を持ちます。
- Model:ロジックを担当
- View:入力を受け取りModelとTemplateを制御
- Template:入出力を担当
一般的に、MVCモデル(Model/View/Controller)が有名ですが、MVTのViewはMVCのControllerに相当し、MVTのTemplateはMVCのViewに相当します。
具体的なルーティングとして図解を記載しておきます。
FlaskにおけるModelの役割
FlaskにおいてModelは以下の役割を持ちます。
- データベースを作成する
- データベースを操作する
つまり、Modelはデータベースのテーブルを定義することになります。
データベースを構築する際に必要な知識が以下の内容になります。
- flask-sqlalchemy
- flask-migrate
- SQLite
FlaskにおけるModelの役割について詳細に知りたい人は、「【Flask】Webアプリ開発におけるModelの役割」を一読ください。
FlaskにおけるViewの役割
FlaskにおいてViewは以下の役割を持ちます。
- データベースを操作する
- PRGに基づいてルーティングとテンプレートを制御する
つまり、ViewはModelとTemplateを制御することになります。
Viewを実装する際に必要な知識が以下の内容になります。
- CRUD機能の理解
- ルーティングの理解
- PRG(Post/Redirect/Get)パターン
- render_template
- redirect
- url_for
- request
Viewの作成方法やデータベース/テンプレート制御を具体的に知りたい人は、「【Flask】Webアプリ開発におけるViewの役割」を一読ください。
FlaskにおけるTemplateの役割
FlaskにおいてTemplateは以下の役割を持ちます。
- ViewからTemplateへのデータの受け渡し
- ルーティング情報に沿ったテンプレート作成(各ページ)
- <a>タグ, <form>タグ, <button>タグが持つルートデザイン設計
- CSSによるUI/UXを意識したデザイン調整
つまり、Templateはユーザー行動を意識したデザインを考慮することになります。
Templateを実装する際に必要な知識が以下の内容になります。
- ルーティングの理解
- テンプレートエンジン(jinja2)の理解
- 共通テンプレートと継承
- データ出力のロジック設計
Templateの作成方法や共通化/継承など具体的に知りたい人は、「【Flask】Webアプリ開発におけるTemplateの役割」を一読ください。
